Last week I had a hiatus from continuing to write “Passing the torch” – more rather I was a bit lazy.
But this week I am back on it and can proceed to describe the next stage of the process.
Now, things were getting serious as I had to braze the seat stays onto the frame at the dropouts and seat lug.
Before any of that, it was time to do some more practice brazing.
I slotted and finished the ends of some seat stay offcuts, and brazed them onto some scrap plate dropouts. The main challenge was to not only make sure there was a good bond in the gap between the dropout and the seat stay, but to fill in the hole at the end of the seat stay.
 This took a few goes to get an understanding of how the tobin bronze acted when the metal was heated up. As the dropout was thicker than the seat stay, it required more heat to get up to temperature and melt the bronze.
But, if it got too hot, the bronze would just liquify upon contact and sort of “splash” onto the dropout. So it was important to heat the dropout and seat stay enough to melt the bronze, then continue heating the gap in the slot to draw the bronze into the seat stay, forming a strong bond.
Then to fill the hole at the seat stay, I held the bronze rod inside the hole and heated around it until it melted, then took the flame away to ensure the bronze didn’t melt too much and filled the hole. 
This took a few goes with the practice dropouts, but I was fairly confident I’d get it right on the real thing. My main mistake during the practice runs was that I was not heating the very top of the dropout tab, meaning the bronze did not flow all the way to the top of the slot. In real world terms, a crack could form from that tiny area of no contact – and it would only get bigger.
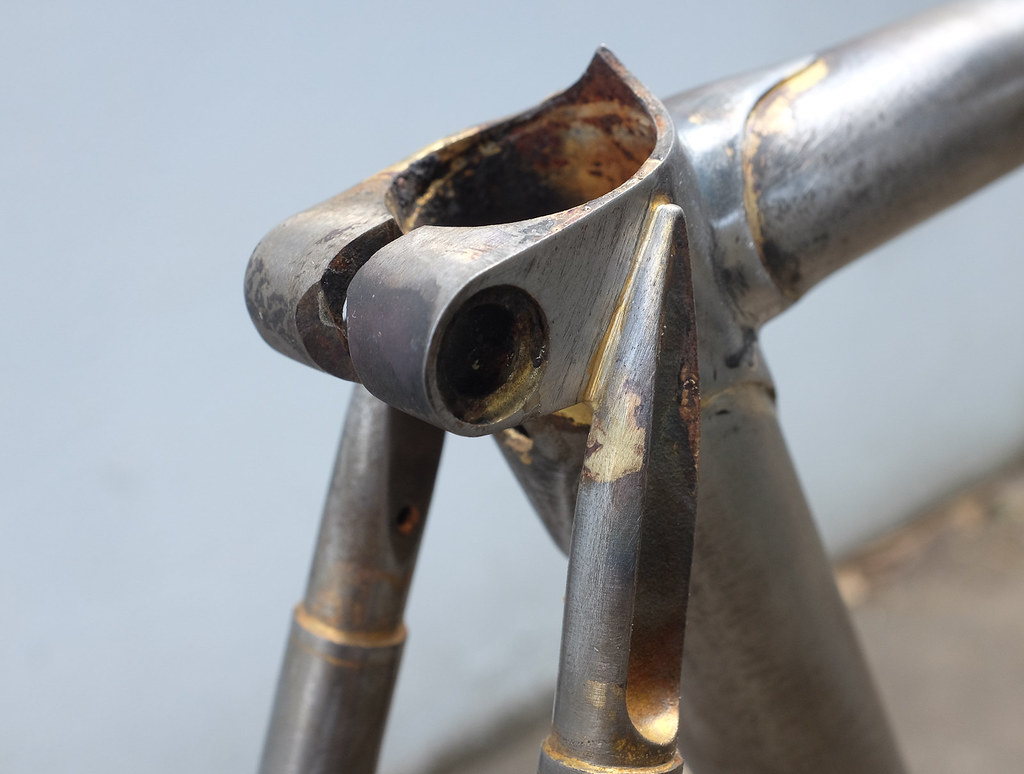
The other thing to attempt was brazing the seat stay cap to the seat lug. The seat lug with the seat tube inside is quite thick, and the seat stay cap is only so big. Again, even heating was the challenge, and also ensuring the surfaces were hot enough to flow filler in. Intuition was required to trust the metal surfaces touching one another were hot enough as it would not have been easy to see.
And the main consideration to take connecting the seat stay cap to the seat lug is to form a small fillet of bronze on the rear seat tube side of the frame, just for additional reinforcement.
So, with enough practice, it was time to mix up more flux and fit up the seat stays to the frame. This is where the seat stay holders came in handy to make sure both stays were sitting at the same height and angle.
 There was a bit of difficulty eyeing this off as there was flux everywhere, but I worked it out.
Now, as everything was held in place, I would have to do one seat stay at a time, dropout then seat lug, and then match the opposite side seat stay.
 Off I went with the brazing. The first side went fine. The dropout was filled with the seat stay. The seat lug side needed some time heating, but the filler got in, perhaps a bit too much. But it wasn’t too badly burnt, and that was a good thing.

Now to the second side. Dropout was fine, the seat lug the more burnt side of the two but the filler was well filled and a dab or two got onto the seat stay cap – nothing that couldn’t be dremmeled out. As for the fillets, I didn’t really have any idea what I was doing, but I stuck the filler rod there for a moment and heated things up, then moved away the flame periodically to ensure nothing was melting and dripping away too much.


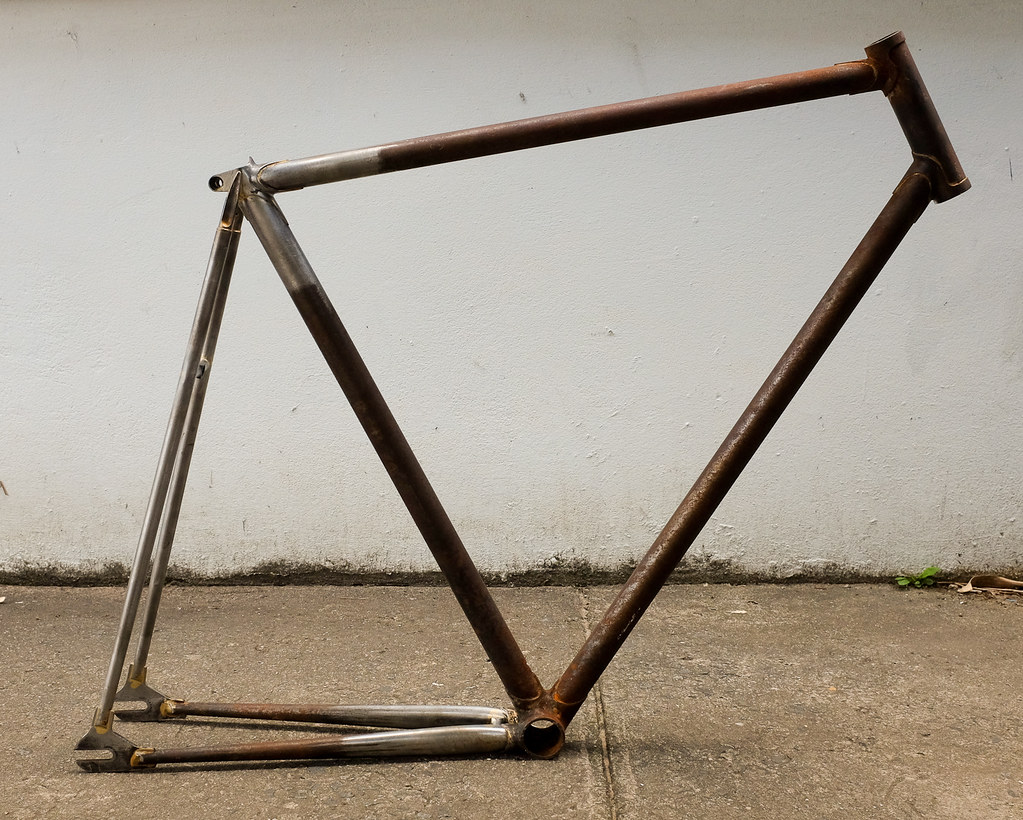
 Then… cleanup. A couple of afternoons worth of filing, sanding, filing, sanding. Not much to say here. Once it was all cleaned up, a visual inspection of how everything was. It was all filled.. but the spacing was completely shot. I did not use a dummy axle during brazing and everything shrunk during the cooling process, making the rear spacing down to 115mm.
It also appeared that the drive side seat stay cap had shifted ever so slightly during brazing and was visually lower than the non-drive side. That was ok though, I would live with it.
Because no bridges had been brazed in yet, I could easily readjust the spacing of the frame. So, a bit of pushing and pulling with the frame mounted by the BB post of our jig, with regular checking via our various alignment tools and we were back in business at 120mm spacing.
I was almost there! Now was for the chain stay bridge and seat stay bridge to be brazed in. 


The chain stay bridge was first, and it was fairly straightforward. By having the frame propped sideways on our work stand, the bridge was not moving anywhere once fitted. A generous coating of flux inside and out, adequate heat control and it was brazed in. I kept it fairly clean, nothing a wire brush and file couldn’t get out.


Next was the seat stay bridge. This was a considered choice, since I decided I may want to occasionally set up the bike as a single speed, I would need to run a rear brake. Don’t run a single brake with a single speed, kids! Fixed gear… front is recommended (but I often ride brakeless).
Because I needed to run two brakes, my seat stay bridge needed to be one that was drilled for brakes. Otherwise, I would have just used a seat stay cut-off. Where was I going to source a drilled brake bridge? Off of a scrap frame of course.
With the torch set on a strong flame, the filler material would melt and pulling the seat stays apart meant the bridge separated from the frame. P.S. paint fumes smell bad and are probably toxic if inhaled too deeply.
So with the brake bridge cannibalised from a donor frame, a simple reshape of the pre-mitered tube was quickly done with the dremel. My filing is still occasionally wonky at the best of times, so the dremel took out some of the guesswork.
I frequently checked the fit-up of the bridge between the seat stays to both ensure the bridge was level, and more critically that it cleared the tire and provided enough brake drop for a caliper. It’s all about the real-world considerations. What is the point of a tight frame if it can’t fit larger than 20c tires?


The bridge position was optimised for 23c tires, with room for 25c when necessary. The range of brake drop was also ideal for most wheel positions in the dropout.

Now that the bridge was ready for brazing, I learnt this time and put a dummy axle spaced at 120mm to preserve the rear spacing.
More flux, and this time the goal was to build a small fillet around the mitered brake bridge and the seat stay. I moved quickly with the torch, rubbing the bronze rod against the steel to get it to melt and fill.


Happy to say, I did a pretty clean job, if somewhat light on the filler rod. But it was all there, filled.


^ this was just after a splash of hot water – the flux washed right off.
The dummy axle stopped the rear spacing from shrinking, glad to report.
All that was left now was for the frame to get sandblasted at Quang’s work, and check over any spots that needed filling because there was a gap here and there from Peter’s work.


Great work, I’m enjoying following your build.